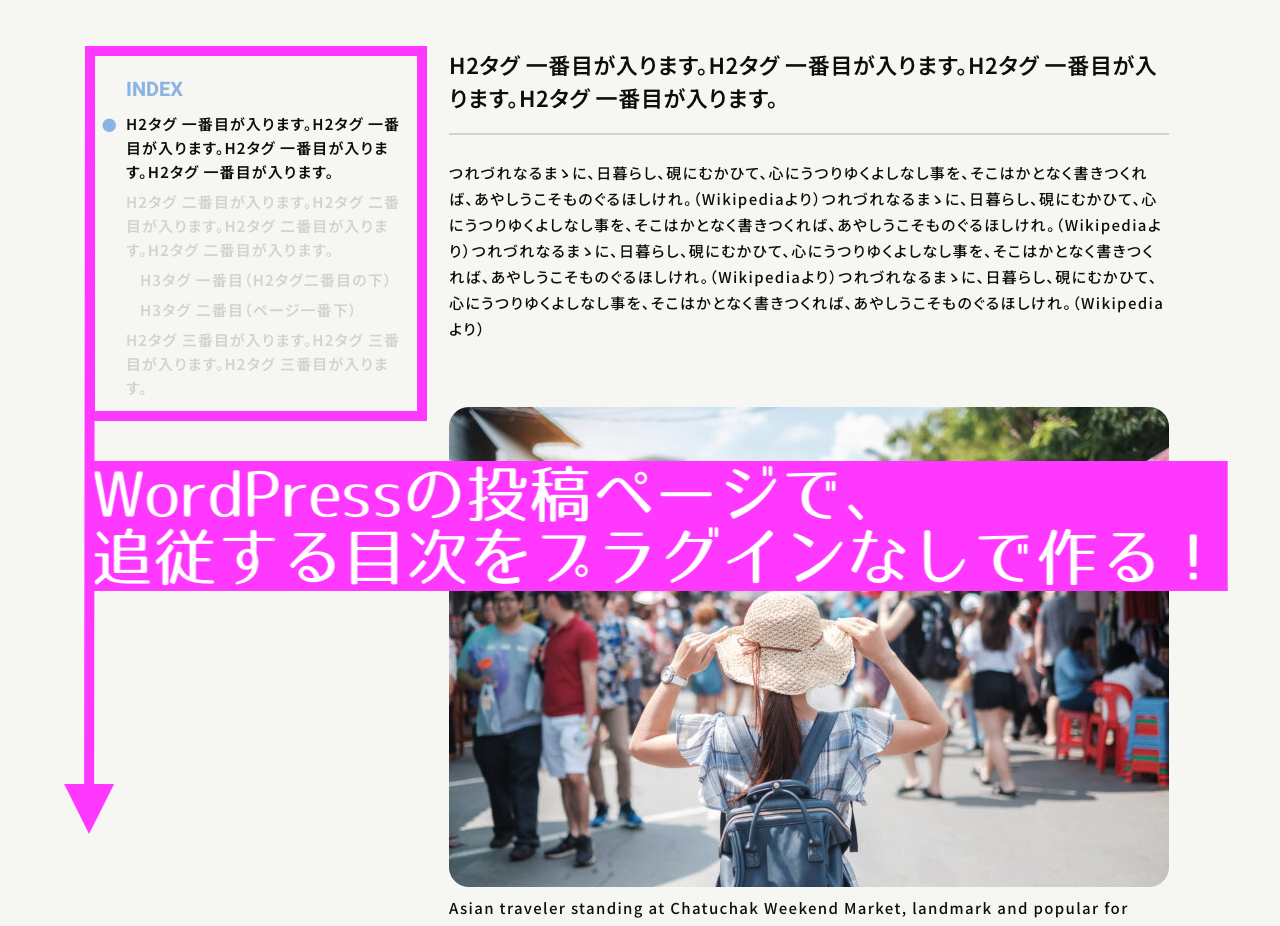
出来上がりイメージ
スクロールすると左列の目次が、右列の見出しと交差した時に該当する部分の色が変わる仕組みです。
さらに上にスクロールすると、
真横の目次を通り過ぎると、一つ上の目次に色が変わるようにしています。
こうすることで、セクションごとに目次が変わるように見せています。
実装方法
※自作でWordPressのテーマを構築する人向けの解説になります!
PHP(functions.php)
- 「Intersection Observer」(JavaScriptで目次の色を変える時に使用)を使うために、記事内の見出しに
idとdata-indexを追加するようにしています。 - 記事内の見出しを取得し、目次として出力します。
対象投稿タイプ・対象にする見出し・目次の階層数は、以下に沿って3箇所修正してください。
- 【設定①】対象投稿タイプの設定
'post','works', 'document', 'seminar'のように設定してください。カスタム投稿タイプにも対応しています。 - 【設定②】対象にする見出しのトップを設定
'toplevel'の値を見出しの階層に合わせて設定してください。2はh2を意味します。 - 【設定③】目次の階層数を設定
'depth'の値を見出しの深さに合わせて設定してください。2は2段階なので、この場合h2,h3のみを意味します。
<?php

/**
 * シングルページの見出しを自動生成する
 */
class Toc_Shortcode
{

	private $add_script = false;
	private $atts       = array();

	public function __construct()
	{
		add_shortcode('toc', array($this, 'shortcode_content'));
		add_action('wp_footer', array($this, 'add_script'), 999999);
		add_filter('the_content', array($this, 'change_content'));
	}

	function change_content($content)
	{
		// 【設定①】投稿タイプ 'works', 'document', 'seminar' の詳細ページのみ目次を出力する
		if (is_singular(array('works', 'document', 'seminar'))) {

			// attsが初期化されていない場合のデフォルト値を設定
			if (!isset($this->atts['toplevel'])) {
				$this->atts['toplevel'] = 2; // 【設定②】対象にする見出しのトップを設定。2はh2を意味する
			}

			if (!isset($this->atts['depth'])) {
				$this->atts['depth'] = 2; // 【設定③】見出しの深さを設定。2は2段階なので、この場合h2,h3のみを意味する
			}

			// ショートコード内のtoplevelとdepthの値が反映させるようにする
			$toplevelAtts  = $this->atts['toplevel'];
			$depthAtts     = $this->atts['depth'];
			$depthAttsStep = $toplevelAtts + $depthAtts - 1;
			$stepFilter    = '/<(h[' . $toplevelAtts . '-' . $depthAttsStep . '])(.*?)>/u';

			// コンテンツを要素に分割
			$elements = preg_split('/(<h[1-6].*?<\/h[1-6]>)/u', $content, -1, PREG_SPLIT_DELIM_CAPTURE);

			// $elementsが配列でない場合は処理をスキップ
			if (!is_array($elements)) {
				return $content;
			}

			$id = 1; // IDの初期化

			foreach ($elements as &$element) {
				if (0 === strpos($element, '<h')) {
					if (preg_match($stepFilter, $element)) {
						if (! preg_match('/<h[1-6](.*?) id="([^"]*)"/u', $element)) {
							$s = preg_replace($stepFilter, '<${1} id="toc' . $id . '" ${2} data-index="' . $id . '">', $element);
							if ($element !== $s) {
								$element = $s;
							}
						}
						$id++;
					}
				}
			}

			// 要素を結合して返す
			return implode('', $elements);
		}

		return $content;
	}


	public function shortcode_content($atts)
	{
		global $post, $page;

		if (! isset($post)) {
			return '';
		}

		// ショートコードの初期値
		$this->atts = shortcode_atts(
			array(
				'id'        => '',
				'class'     => 'p-single-toc',
				'title'     => '目次',
				'toggle'    => true,
				'opentext'  => '開く',
				'closetext' => '閉じる',
				'close'     => false,
				'showcount' => 2,
				'depth'     => 0,
				'toplevel'  => 2,
				'scroll'    => 'smooth',
			),
			$atts
		);

		$this->atts['toggle'] = (false !== $this->atts['toggle'] && 'false' !== $this->atts['toggle']) ? true : false;
		$this->atts['close']  = (false !== $this->atts['close'] && 'false' !== $this->atts['close']) ? true : false;

		$content = $post->post_content;
		// var_dump( $content );
		$content = function_exists('do_blocks') ? do_blocks($content) : $content;

		$split     = preg_split('/<!--nextpage-->/msuU', $content);
		$pages     = array();
		$permalink = get_permalink($post);

		if (is_array($split)) {
			$page_number   = 0;
			$counter       = 0;
			$counters      = array(0, 0, 0, 0, 0, 0);
			$current_depth = 0;
			$prev_depth    = 0;
			$top_level     = intval($this->atts['toplevel']);
			if ($top_level < 1) {
				$top_level = 1;
			}
			if ($top_level > 6) {
				$top_level = 6;
			}
			$this->atts['toplevel'] = $top_level;
			$max_depth              = (($this->atts['depth'] == 0) ? 6 : intval($this->atts['depth']));

			$toc_list = '';

			foreach ($split as $content) {
				$headers = array();
				preg_match_all('/<(h[1-6])(.*?)>(.*?)<\/h[1-6].*?>/u', $content, $headers);
				$header_count = count($headers[0]);
				$page_number++;


				$step = 1; // 目次の番号.

				for ($i = 0; $i
					< $header_count; $i++) {
					$depth = 0;
					switch ($headers[1][$i]) {
						case 'h1':
							$depth = 1 - $top_level + 1;
							break;
						case 'h2':
							$depth = 2 - $top_level + 1;
							break;
						case 'h3':
							$depth = 3 - $top_level + 1;
							break;
						case 'h4':
							$depth = 4 - $top_level + 1;
							break;
						case 'h5':
							$depth = 5 - $top_level + 1;
							break;
						case 'h6':
							$depth = 6 - $top_level + 1;
							break;
					}
					if ($depth >= 1 && $depth <= $max_depth) {
						if ($current_depth == $depth) {
							$toc_list .= '</li>';
						}
						while ($current_depth > $depth) {
							$toc_list .= '</li></ul>';
							$current_depth--;
							$counters[$current_depth] = 0;
						}
						if ($current_depth != $prev_depth) {
							$toc_list .= '</li>';
						}
						if ($current_depth < $depth) {
							$class     = $current_depth == 0 ? ' class="p-single-toc__list"' : '';
							$style     = $current_depth == 0 && $this->atts['close'] ? ' style="display: none;"' : '';
							$toc_list .= "<ul{$class}{$style}>";
							$current_depth++;
						}
						$counters[$current_depth - 1]++;
						$number = $counters[0];
						for ($j = 1; $j < $current_depth; $j++) {
							$number .= '.' . $counters[$j];
						}
						$counter++;

						if (preg_match('/.*? id="([^"]*)"/u', $headers[2][$i], $m)) {
							$href = '#' . $m[1];
						} else {
							$href = '#toc' . $step;
						}

						if ($page != $page_number) {
							if (1 == $page_number) {
								$href = trailingslashit($permalink) . $href;
							} else {
								$href = trailingslashit($permalink) . $page_number . '/' . $href;
							}
						}

						$toc_list .= '<li' . ($page !== $page_number ? ' class="other-page"' : '') . '>';
						$toc_list .= '<a href="' . esc_url($href) . '" data-index="' . $step . '"><span class="contentstable-number">' . $number . '</span> ' . strip_shortcodes($headers[3][$i]) . '</a>';

						$prev_depth = $depth;

						$step++; // 目次に追加されたら番号を増やす.
					}
				}
			}

			while ($current_depth >= 1) {
				$toc_list .= '</li></ul>';
				$current_depth--;
			}
		}

		$html = '';
		if ($counter >= $this->atts['showcount']) {
			$this->add_script = true;

			$toggle = '';
			if ($this->atts['toggle']) {
				$toggle = ' <span class="toc-toggle">[<a class="internal" href="javascript:void(0);">' . ($this->atts['close'] ? $this->atts['opentext'] : $this->atts['closetext']) . '</a>]</span>';
			}

			$html .= '<div' . ($this->atts['id'] != '' ? ' id="' . $this->atts['id'] . '"' : '') . ' class="' . $this->atts['class'] . '">';
			$html .= '<p class="p-single-toc__title">' . $this->atts['title'] . $toggle . '</p>';
			$html .= $toc_list;
			$html .= '</div>' . "\n";
		}

		return $html;
	}

	public function add_script()
	{
		if (! $this->add_script) {
			return false;
		}

		$var = wp_json_encode(
			array(
				'open_text'  => isset($this->atts['opentext']) ? $this->atts['opentext'] : '開く',
				'close_text' => isset($this->atts['closetext']) ? $this->atts['closetext'] : '閉じる',
				'scroll'     => isset($this->atts['scroll']) ? $this->atts['scroll'] : 'smooth',
			)
		);
	}
}

$toc = new Toc_Shortcode();
PHP(single.php 目次部分)
該当する部分に以下のショートコードを書いてください。
toplevelとdepthの値は先ほど設定した値を入れてください。
このショートコードと、記事本文に見出しをつけるシステムは連動していないので、わざわざ設定する必要があります。
ショートコードの初期値設定は、PHP(functions.php)の中盤くらいに書いています。
<aside class="p-single-wrap__aside">
<div class="p-single-wrap__aside-sticky">

		<?php //PHPに設定した値(toplevel、depth)をショートコードにも設定する。
			echo do_shortcode('[toc title="INDEX" toplevel="2" depth="2" toggle="false"]'); ?>

</div>
</aside>
ショートコードにはオプションを追加できます。
- title:目次のタイトル
- toplevel:見出しタグ(1 から 6)を指定。(2 は h2)
- depth:出力する階層数。
例えば、toplevel=”2″ depth=”2″ の場合は、h2 , h3が対象になります。 - toggle:目次の開閉ボタン(falseはボタンなし)
詳しいショートコードの使用方法については、こちらの参考サイトをご確認ください!
(この参考サイト様のおかげで実装できました!ちなみに、Intersection Observerを使えるようにするために、参考サイト様のPHPコードからさらに改造しています。)
PHP(single.php 記事本文)
PHPコードの変更点はないです。
<div class="p-single-contents">
	<?php the_content(); ?>
</div>
JavaScript
かなり長いコードなので、簡単に解説します。
- スムーススクロール(追従ヘッダーと被らないようにするために、
.l-headerの高さを計算するようしています) - 読み込んだタイミングで、目次の1番目に.is-activeを付与します。
- Intersection Observerの設定。
WordPressの見出しタグには.wp-block-headingを自動的についています。それにPHPで追加した見出しの[data-index]と、同じ[data-index]をもつ目次リンクに.is-activeを付与します。 - 「上にスクロールした時、真横の目次を通り過ぎると、一つ上の目次に色が変わるようにする」ために、[data-index]の直上の要素に[data-index]を追加。
(これで、Intersection Observerの変更ポイントを増やします。) - 目次をクリックしたら、クリックした目次に.is-activeを付与します。
  // #で始まるアンカーをクリックした場合にスムーズスクロール===========
  //HTML要素を読み込んでから実行
  document.addEventListener("DOMContentLoaded", function () {
    // #で始まるアンカーをクリックした場合に処理
    document.querySelectorAll('a[href^="#"]').forEach(function (anchor) {
      anchor.addEventListener("click", function (event) {
        event.preventDefault();
        // アンカーの値取得
        let href = this.getAttribute("href");
        // 移動先を取得
        let target =
          href === "#" || href === ""
            ? document.documentElement
            : document.querySelector(href);
        //ヘッダーの高さ取得
        if (target) {
          const headerHeight = document.querySelector(".l-header").clientHeight;
          // 移動先を数値で取得
          let targetRect = target.getBoundingClientRect();
          let scrollTop =
            window.pageYOffset || document.documentElement.scrollTop;
          let position = targetRect.top + scrollTop - headerHeight; //アンカーポイントより上に移動

          window.scrollTo({
            top: position,
            behavior: "smooth",
          });
        }
      });
    });

    //読み込んだタイミングで、目次の1番目に.is-activeを付与
    const firstLink = document.querySelector(".p-single-toc__list a");
    if (firstLink) {
      firstLink.classList.add("is-active");
    }
  });

  // WorePressの記事で、見出しと重なった時に、該当する目次をアクティブ状態にする。======================================================
  // 見出しの直上で、前の目次に切り替わるようにしたい。(文章として一塊に見せたいため)ので、次のようににコードを修正。
  // 「Intersection Observer」は交差位置をラインで検知するため、記事の中で[data-index]の直上に要素がある時、その要素に以下を追加。
  // - .wp-block-heading
  // - data-index。この値は[data-index]についているdata-indexの値から-1したものを付与。

  // Intersection Observerの設定
  const observerOptions = {
    root: null,
    rootMargin: "-40% 0px", // 判定位置が近接しているので、ビューポートの中心からちょっと外れた所を判定基準にする。
    threshold: 0, // 閾値は0
  };

  // .wp-block-headingで[data-index]がついているものを、ビューポートに入った時にコールバック。
  const observerCallback = (entries, observer) => {
    entries.forEach((entry) => {
      if (entry.isIntersecting) {
        // data-indexの値、.is-activeがついた目次リンクを取得
        const dataIndex = entry.target.getAttribute("data-index");
        const activeLink = document.querySelector(
          ".p-single-toc__list a.is-active"
        );

        //a.is-activeがある時だけ処理-----
        if (activeLink) {
          // ビューポートにある.wp-block-headingの[data-index]と同じ[data-index]をもつ目次リンクに.is-activeを付与
          const correspondingLink = document.querySelector(
            `.p-single-toc__list a[data-index="${dataIndex}"]`
          );

          // activeLinkとcorrespondingLinkが異なる時だけ処理
          if (activeLink !== correspondingLink) {
            // 他の全ての目次リンクから.is-activeを取り除く
            activeLink.classList.remove("is-active");
            // 対応する目次リンクに.is-activeを付与
            if (correspondingLink) {
              correspondingLink.classList.add("is-active");
            }
          }
        }
      }
    });
  };

  // let observerとして変数化
  let observer;

  //.wp-block-heading クラスであり、かつ data-index 属性が付いている要素を配列にする
  const targetElements = document.querySelectorAll(
    ".wp-block-heading[data-index]"
  );

  // 監視対象の要素が存在する場合のみObserverを作成
  if (targetElements.length > 0) {
    // Intersection Observer をインスタンス化し、targetElements内の要素を監視対象として登録
    targetElements.forEach((el) => {
      observer = new IntersectionObserver(observerCallback, observerOptions);
      observer.observe(el);
    });

    // .p-single-contents内で[data-index]の直上の要素がある場合、その要素に.js-viewportとdata-indexを追加
    const contents = document.querySelector(".p-single-contents");
    if (contents) {
      const headlineElements = contents.querySelectorAll("[data-index]");
      headlineElements.forEach((headline) => {
        const previousElement = headline.previousElementSibling;
        if (previousElement) {
          previousElement.classList.add("js-viewport");
          // data-indexの値を取得
          const dataIndex = headline.getAttribute("data-index");
          if (dataIndex !== null) {
            // data-indexの値を-1して、前の要素に付与
            // getAttributeで取得した値は文字列なので、parseIntで数値に変換
            previousElement.setAttribute("data-index", parseInt(dataIndex) - 1);
          }
          // 新たに追加した要素を監視対象にする
          observer.observe(previousElement);
        }
      });
    }
  }

  // .p-single-toc__list aをクリックしたら、そのクリックしたものに.is-activeを付与
  const tocLinks = document.querySelectorAll(".p-single-toc__list a");
  if (tocLinks.length > 0) {
    tocLinks.forEach((link) => {
      link.addEventListener("click", (e) => {
        e.preventDefault();
        // 他の全てのリンクから.is-activeを取り除く
        tocLinks.forEach((otherLink) =>
          otherLink.classList.remove("is-active")
        );
        // クリックしたリンクに.is-activeを追加
        link.classList.add("is-active");
      });
    });
  }
HTML,CSS
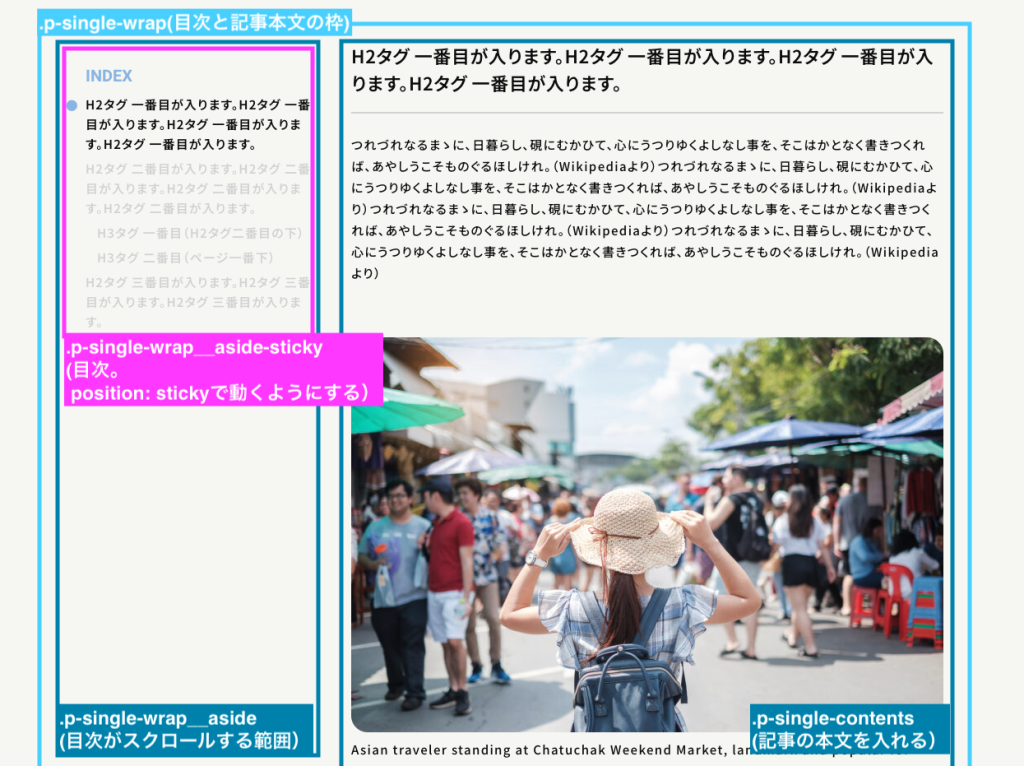
HTMLの構造はスクショの説明をご参照ください!
ポイントは、「目次の要素をposition:stickyで動くようにする」ことです。
position:stickyは、親・先祖要素にoverflow:hiddenがついていると動かないので、コーディングの時は気をつけてください!
必要最低限のCSSだけ書いておきます。
// 目次の枠部分==============================
.p-single-wrap {
    display: flex;
    justify-content: space-between;

  &__aside {
      display: block;
      position: relative;
      min-height: 100%;
      width: 30.1470588235%;
      min-width: 284px;
      padding-left: 45px; //目次の左にマークをつけるためのスペース
      margin-right: 1em;
    }
    &-sticky {
        top: 84px;
        position: sticky;
    }
}

// 目次部分==============================
.p-single-toc {
  &__title {
    font-size: 2rem;
    color: #95bde6;
    font-weight: bold;
  }
  &__list {
    li {
      margin-top: 0.6em;
    }
    a {
      position: relative; //目次の左にマークをつけるため
      font-size: 1.5rem;
      font-weight: 600;
      line-height: 1.6;
      letter-spacing: 0.075em;
      //アニメーション
      transition: color 0.2s ease-in 0.5s; //目次の左マークのタイミングに合わせる

      &::before { //見出しの左マーク
          content: "●";
          position: absolute;
          top: 0;
          left: -45px;
          width: 30px;
          height: 20px;
          color: #95bde6;
          //アニメーション
          transition: opacity 0.2s ease-in 0.5s; //目次の左マークが綺麗に出るように、出るタイミングを遅らせる
          opacity: 0;
      }

      &.is-active {
        color: #0a0a0a;

          &::before {
            opacity: 1;
          }
      }

      &:hover {
        opacity: 1;
        color: #0a0a0a;
      }
    }
  }
  .contentstable-number { //目次の先頭に付与される番号を削除
    display: none;
  }
}

// 記事の本文の枠=======================
.p-single-contents {
    width: 66.17%;
}
おまけ:管理画面のカスタマイズ
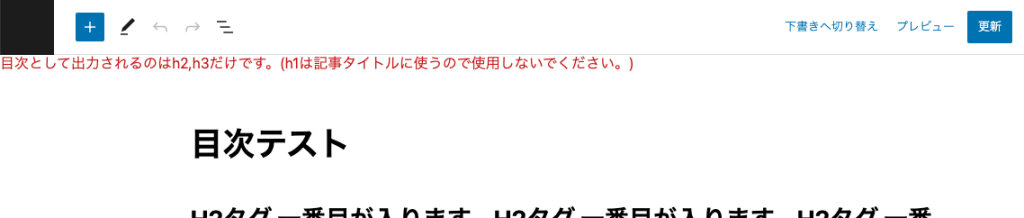
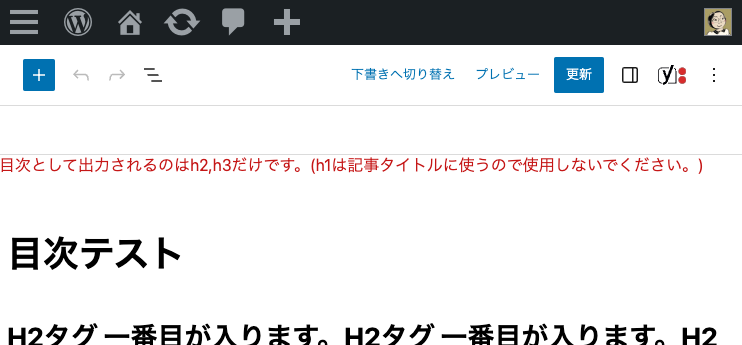
投稿画面で「どの見出しタグが目次になるか」わかるように注釈を追記しました。
レスポンシブにも対応しています。
※ブロックエディタ用に無理やりカスタマイズしています。実装する際はお客様にご確認をとってからやってくださいね!
PHP(functions.php)
条件分岐部分と、文言の部分は手動でカスタマイズしてください!
【追記20240219】カスタム投稿タイプを複数作成しても対応可能にしました!
/**
 * エディタの上に、目次を表示させるための注意書きを追加.
 * (管理ページ、投稿画面詳細ページ)
 *
 * ※出力する目次に合わせて文言を変更すること。
 */
function custom_editor_notice() {
	global $pagenow, $post;

	// 以下の2箇所は手動で変更してください.
	// ① if文の中の「'works', 'document', 'seminar'」.これはカスタム投稿タイプのスラッグ名(複数対応可能).
	// ② 文中のh2,h3.カスタマイズに合わせて変更してください.
	if ( ('post.php' === $pagenow || 'post-new.php' === $pagenow) && in_array($post->post_type, ['works', 'document', 'seminar']) ) {
		echo '<div class="editor-notice">' . esc_html( '目次として出力されるのはh2,h3だけです。(h1は記事タイトルに使うので使用しないでください。)' ) . '</div>';
		echo '<style>
            .editor-notice {
                z-index: 10000;
                position: absolute;
                top: 111px;
                left: 0;
                background: #fff;
                color: #cc1818;
                font-size: 1rem;
                width: 100%;
                display: block !important;
            }
            @media screen and (min-width: 767px) {
                .editor-notice {
                    top: 61px;
                    width: calc(100% - 281px);
                }
            }
        </style>';
	}
}
add_action( 'admin_notices', 'custom_editor_notice' );
【追記1】エラー対応
記事詳細ページの上部に「Notice: Undefined index: toplevel / depth」が表示される
カスタム投稿タイプを増設した時、記事詳細ページの上部に次のエラーが出ました。
Notice: Undefined index: toplevel in /Users/wordpressまでのディレクトリパス/wp-content/themes/テーマ名/class-toc-shortcode.php on line 83

Notice: Undefined index: depth in /Users/wordpressまでのディレクトリパス/wp-content/themes/テーマ名/class-toc-shortcode.php on line 84エラーメッセージの意味は、「toplevel、depthが未定義」で、「shortcode_content メソッドが呼び出される前に、change_content メソッドが呼び出され、その時点で shortcode_atts 関数による $this->atts の初期化が行われていない」。
つまり、「ショートコードtocが読み込みていない。」とのことです。
しかし、ショートコードはちゃんと入れている上に、追従メニューはちゃんと動きます。
そのため、外部要因(プラグインが邪魔していないか)を調べます。
テスト環境で、プラグインを順番に「無効化」した後、ページを更新してエラーが消えるかどうか確かめます。
すると犯人が見つかりました。
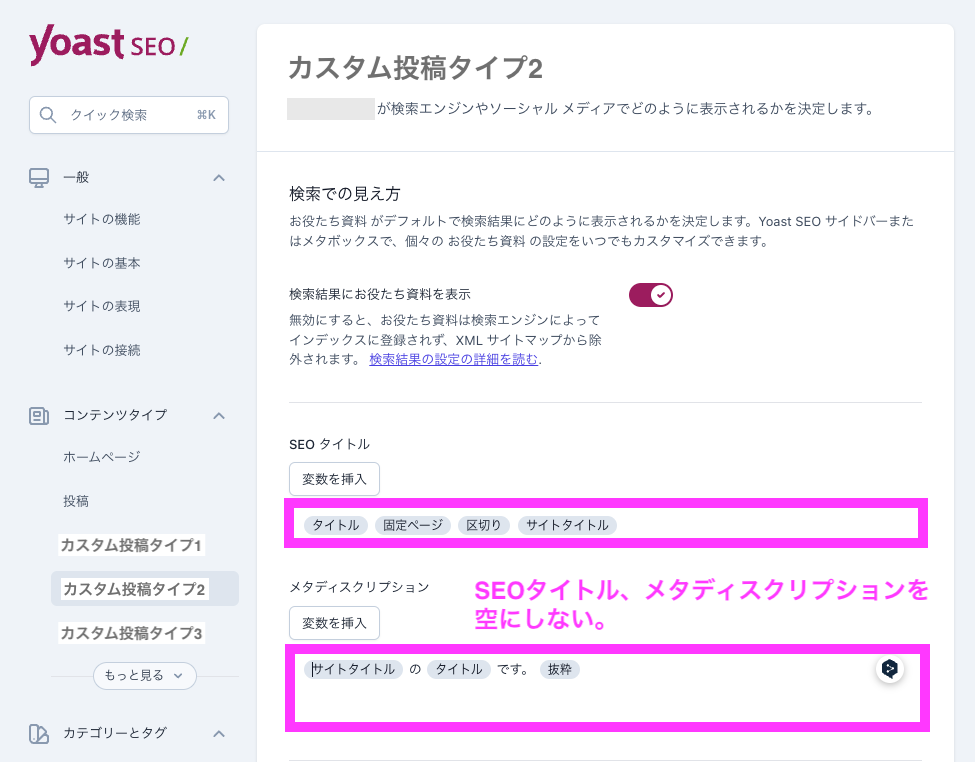
Yoast SEOのディスクリプションが空なのが原因
原因は「Yoast SEO」でした。
[コンテンツタイプ] > [該当のカスタム投稿タイプ]の「SEOタイトル」「メタディスクリプション」を確認したところ、メタディスクリプションが空でした。
ここを変数などで埋めてあげると、エラーは解消されました!
メタデータが空だとエラーが出るようです。
カスタム投稿を新設・増設する際は注意してください!